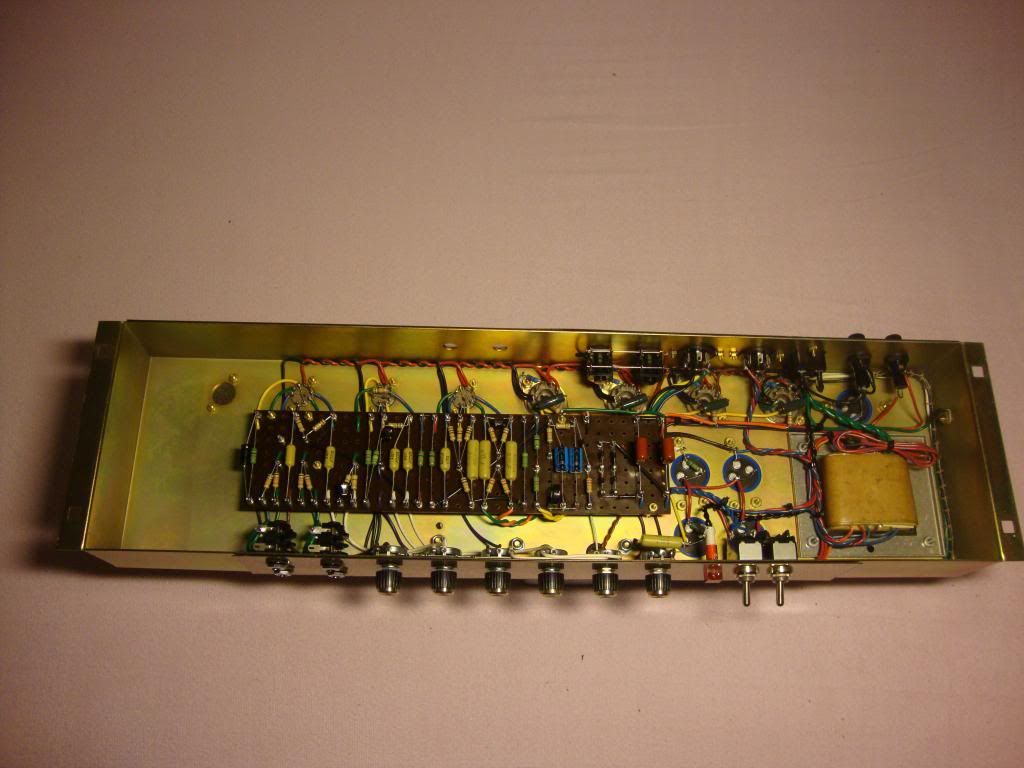
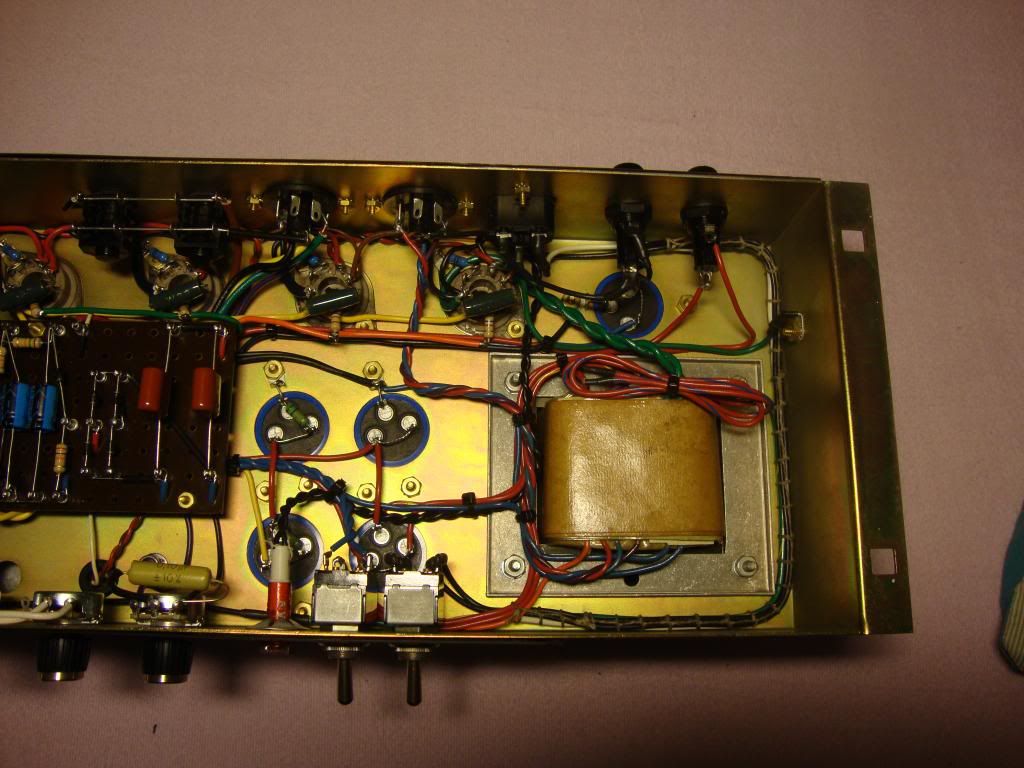
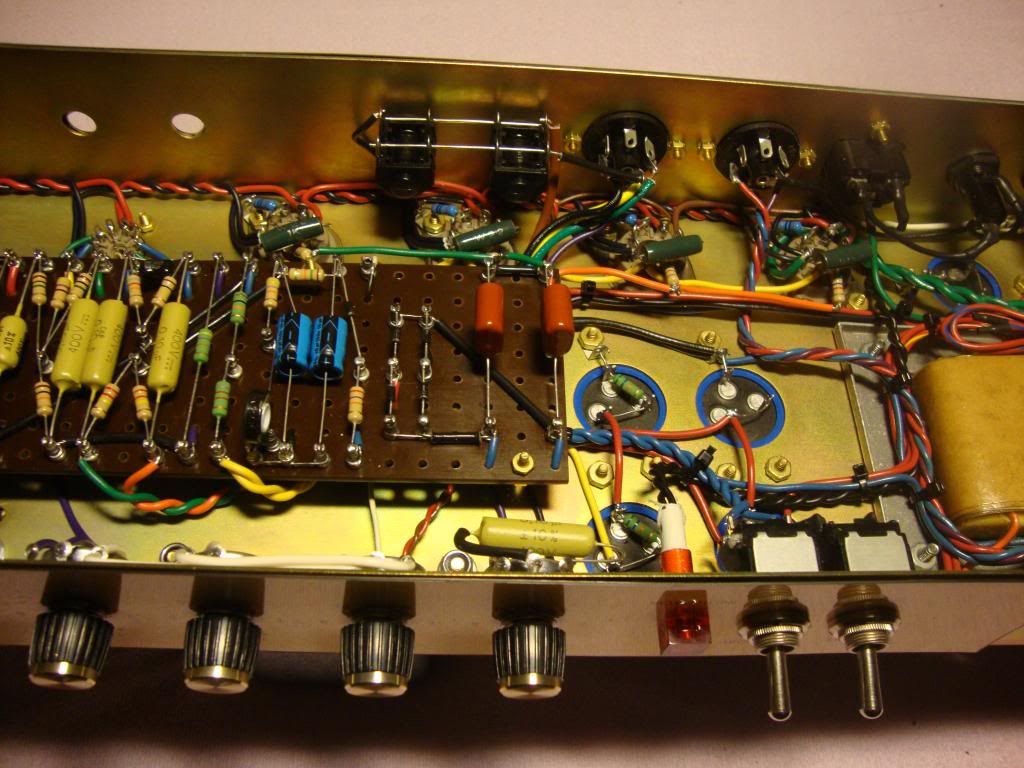
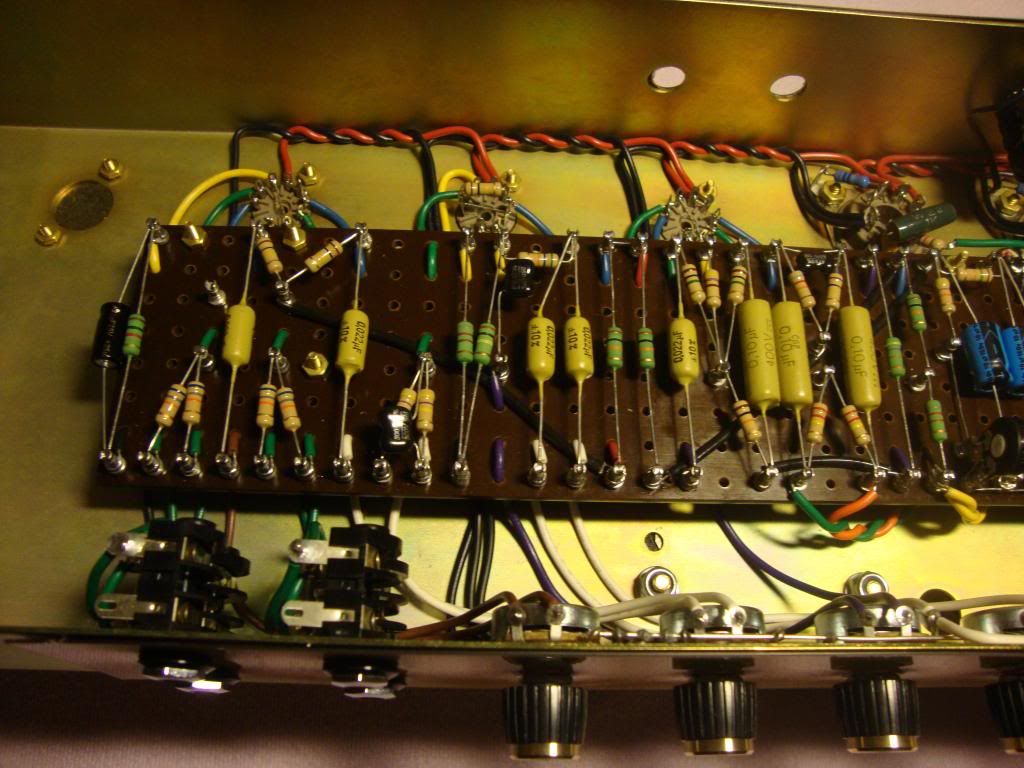
The journey is finally coming to an end- the build is complete. I need to get a speaker cab before I can start testing the amp. I´m waiting for an unloaded 1x12 cab I ordered and need to find a suitable speaker to make a 1x12 speaker cab. I´ll keep you posted.
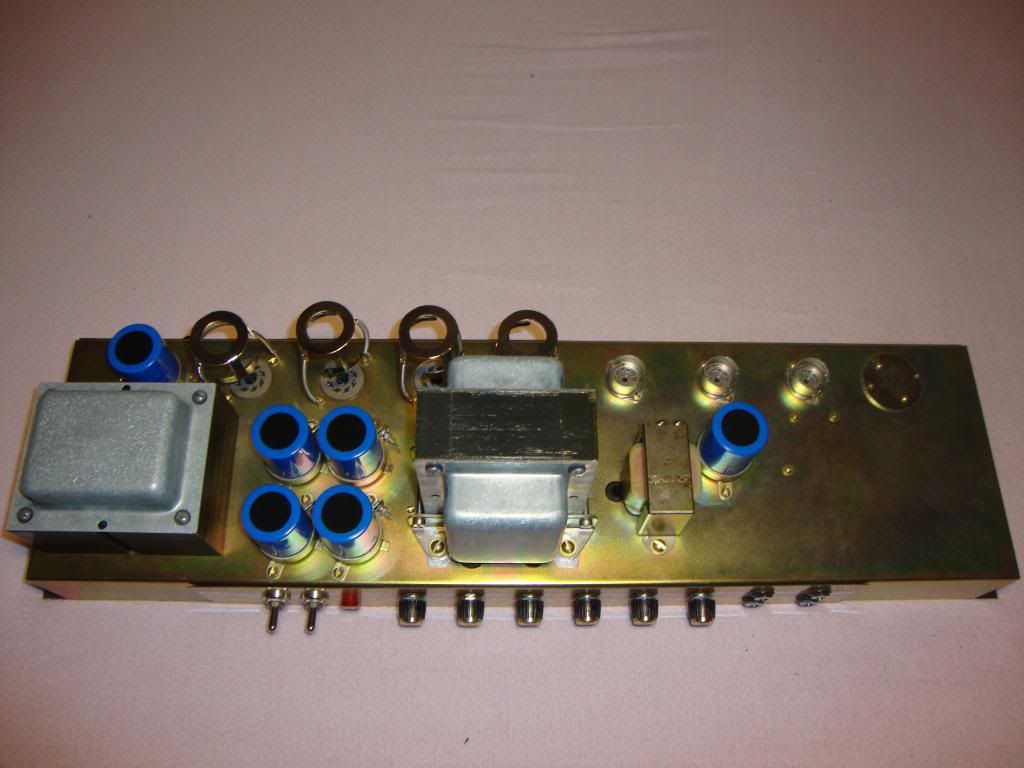
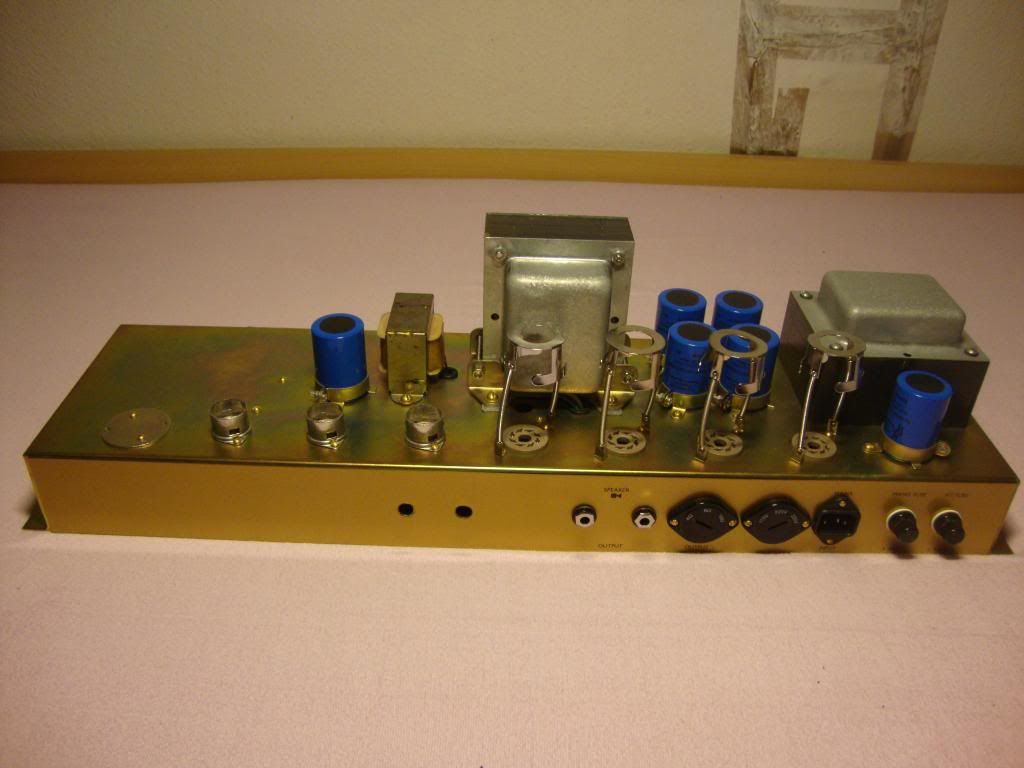
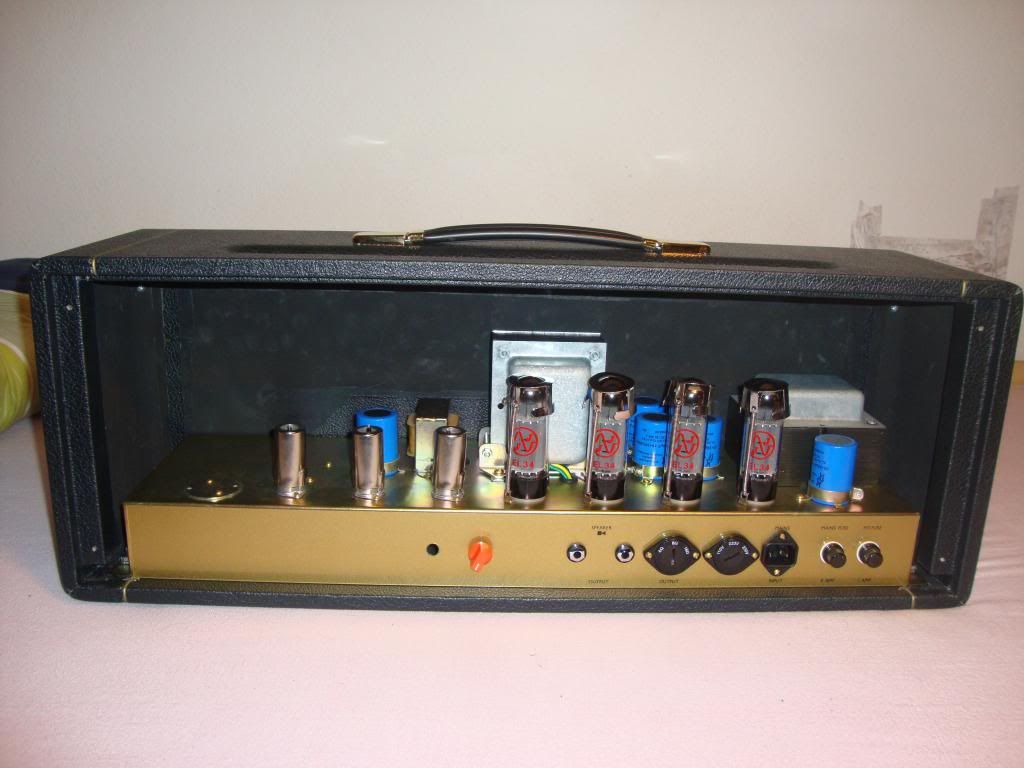
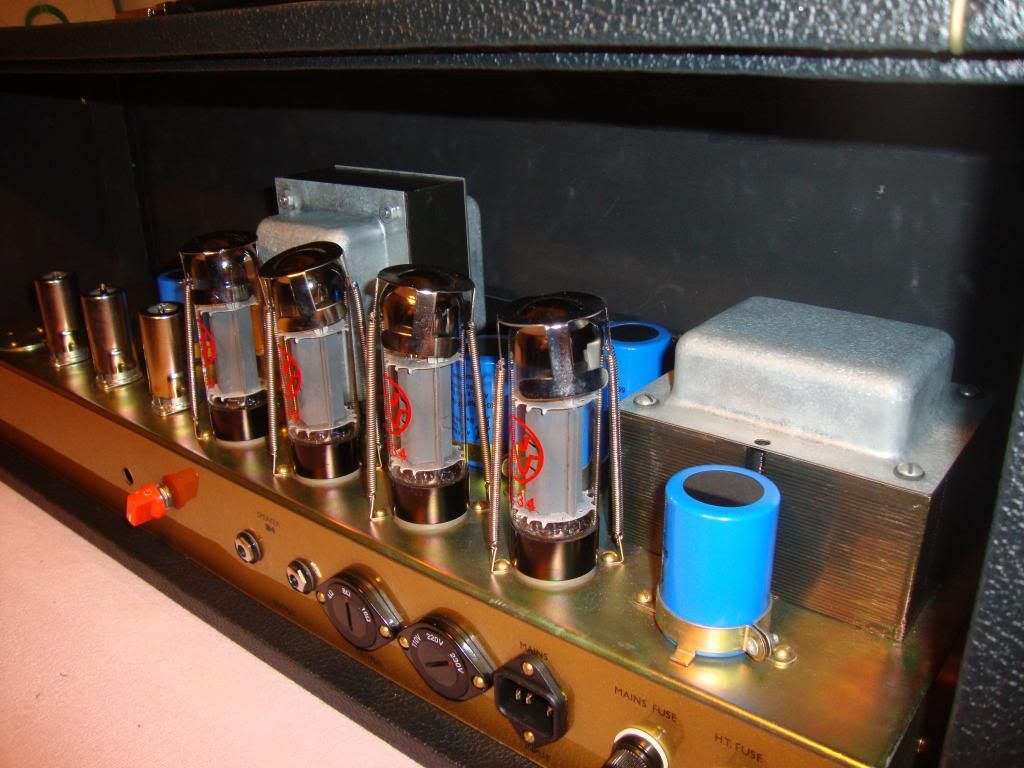
Here are the new pics of the fully assembled amp:
http://i1279.photobucket.com/albums/y52 ... a8478f.jpg" onclick="window.open(this.href);return false;
http://i1279.photobucket.com/albums/y52 ... 271053.jpg" onclick="window.open(this.href);return false;
http://i1279.photobucket.com/albums/y52 ... 3248a6.jpg" onclick="window.open(this.href);return false;
http://i1279.photobucket.com/albums/y52 ... b8a7e1.jpg" onclick="window.open(this.href);return false;
http://i1279.photobucket.com/albums/y52 ... 5230f0.jpg" onclick="window.open(this.href);return false;
http://i1279.photobucket.com/albums/y52 ... b19d98.jpg" onclick="window.open(this.href);return false;
http://i1279.photobucket.com/albums/y52 ... a3d2cf.jpg" onclick="window.open(this.href);return false;
This amp was built with NOS mustard caps and a board from Brian H.
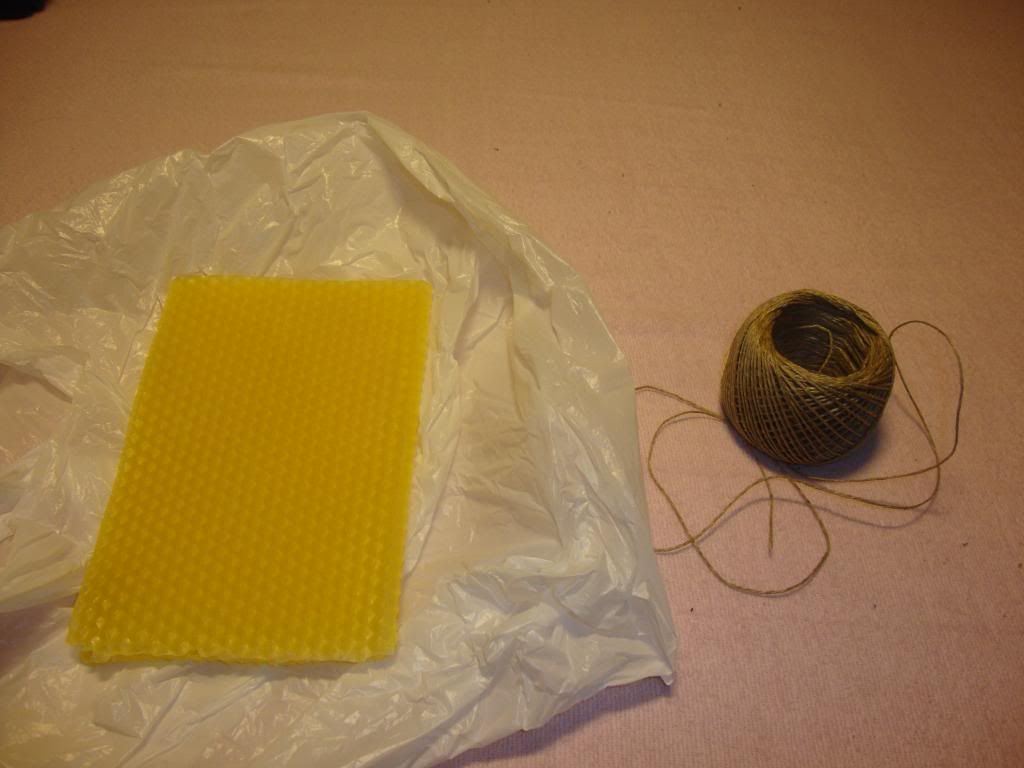
Interesting detail: I was unable to source genuine wire lacing cord - I therefore cooked something up myself. I found out that wax-soaked linen- or hemp-yarn was a common wire lacing material in the 60ies but - surprise surprise - I couldn´t find that stuff anywhere either. So I got some fine hemp yarn and beeswax (directly from the hive):
http://i1279.photobucket.com/albums/y52 ... a98db1.jpg" onclick="window.open(this.href);return false;
I melted the wax in a pot and threw in a few meters of coiled up yarn. The yarn soaks up the wax and voila: You have some genuine 60ies style wire lacing material. The wax makes the yarn more durable and prevents it from acummulating moisture. You can see the waxed yarn used on the wires coming from the fuses and going along the chassis wall.
I think it´s not the best choice material for the job though since it´s basically a long candle wick (and burns like one)...
Looks vintage though and is said to last at least 100 years (we´ll see...).
Cheers
YF
1969 SB build - the journey begins
-
young flower
- Senior Member
- Posts: 119
- Joined: Sun Mar 04, 2012 7:38 pm
- Just the numbers in order: 13492
- Location: Austria, Vienna
-
young flower
- Senior Member
- Posts: 119
- Joined: Sun Mar 04, 2012 7:38 pm
- Just the numbers in order: 13492
- Location: Austria, Vienna
Re: 1969 SB build - the journey begins
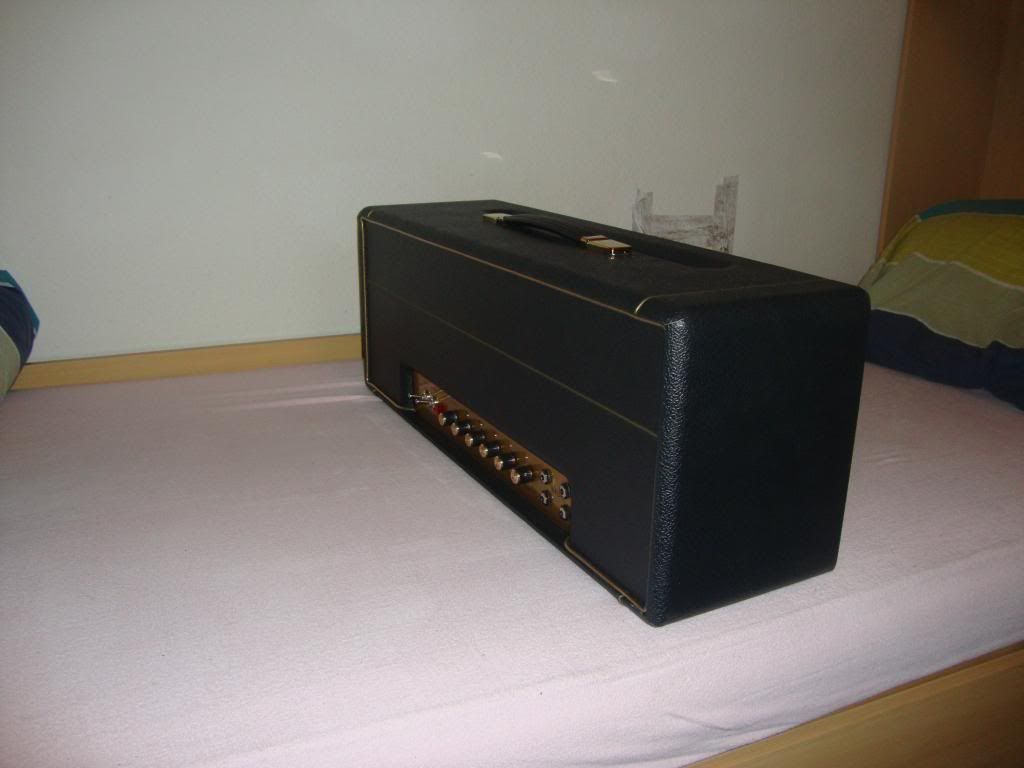
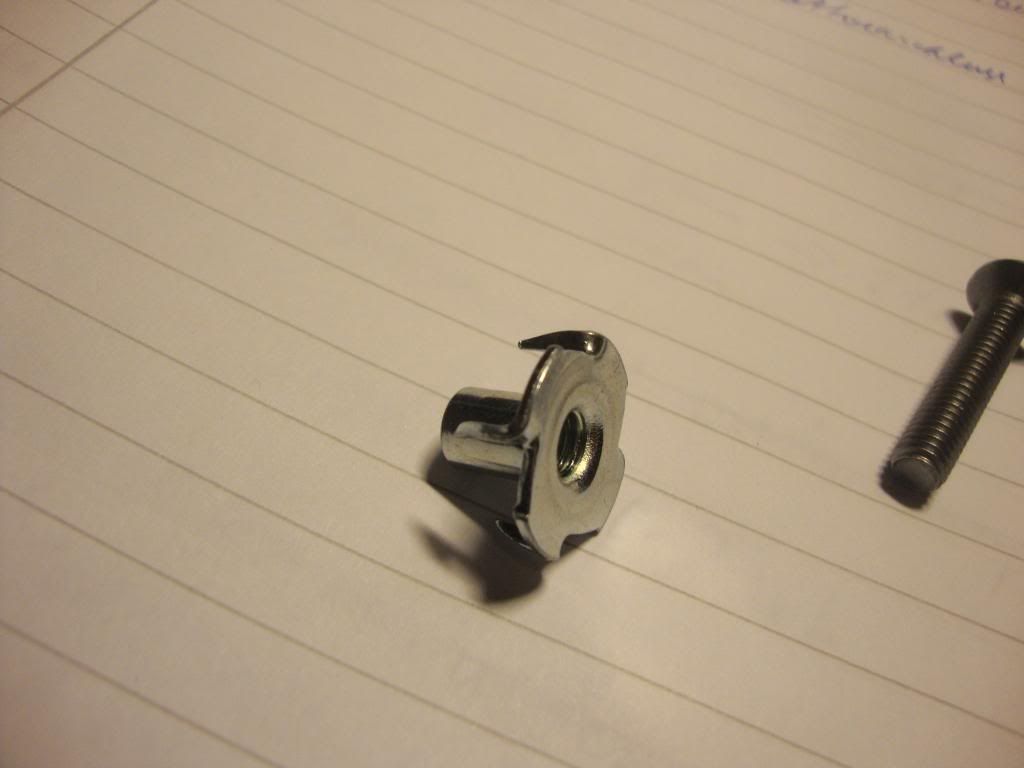
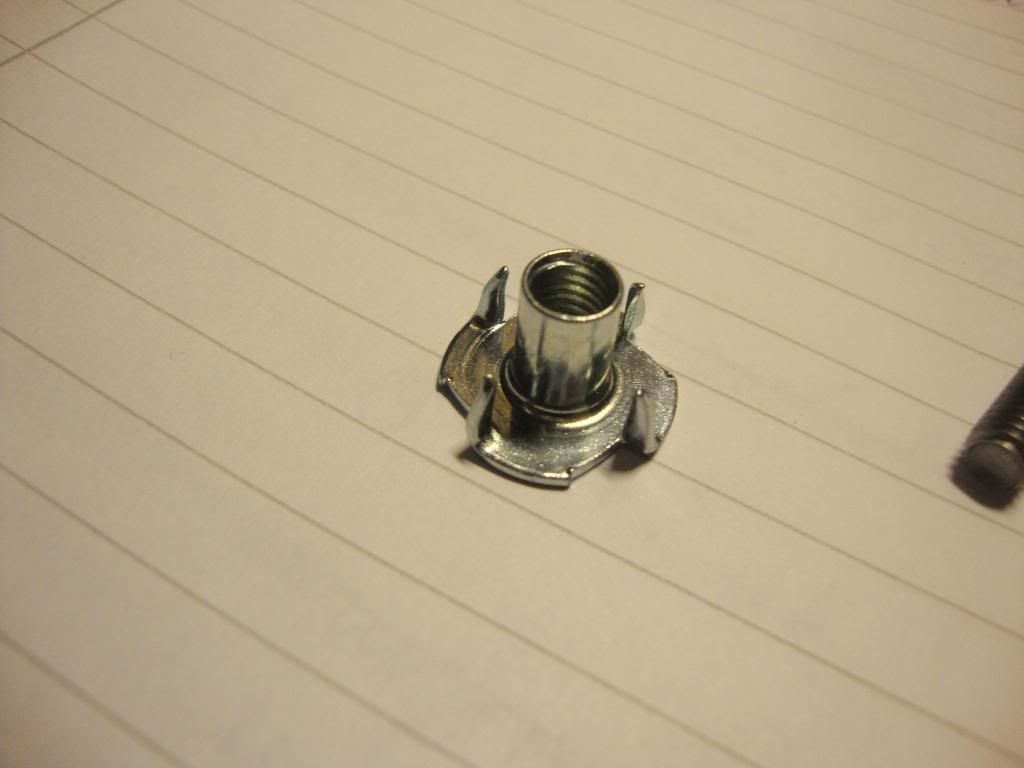
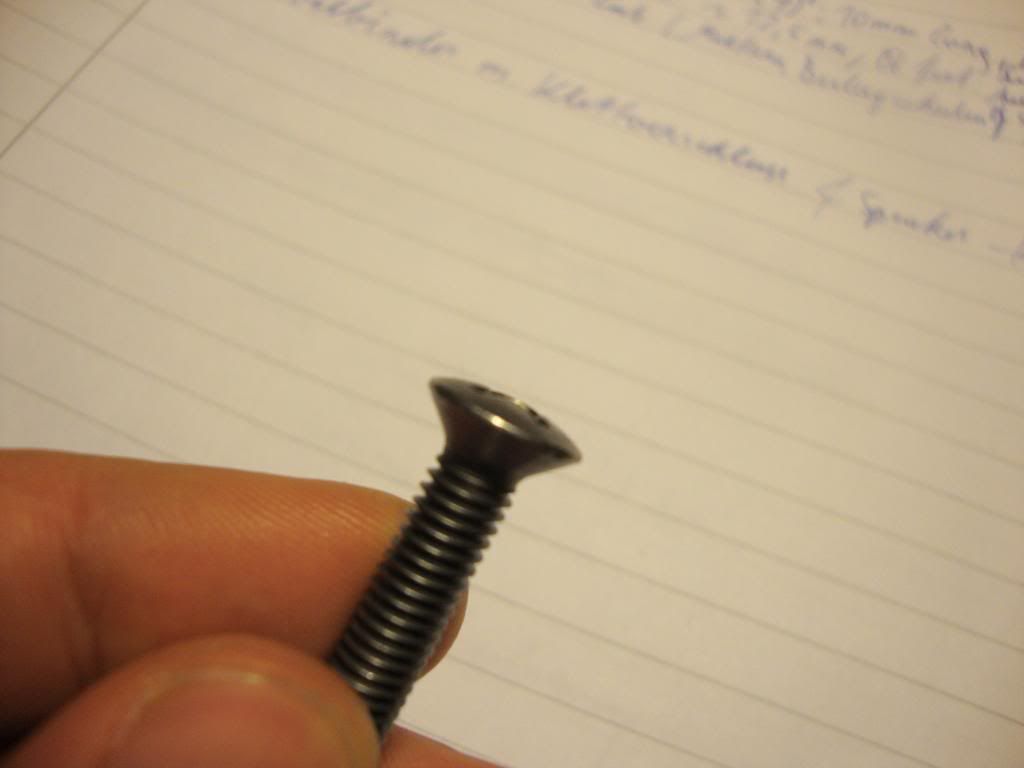
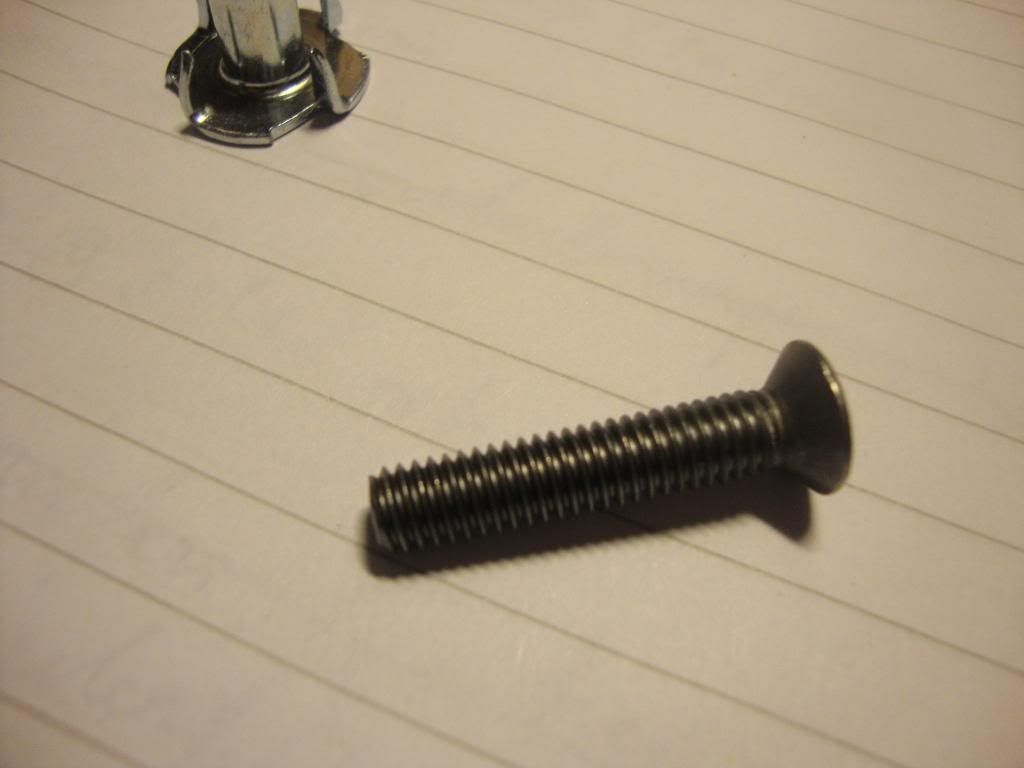
The amp is in its head case now and looks absolutely great. I had a tech do the testing and biasing because my knowledge about electrical engineering is very limited and my experience with high voltage is zero. Just wanted to get around to actually play that thing and I wanted a specialist to have a look at and verify my work. He said everything tested fine and the amp looked and sounded great. I didn´t have a chance to listen to/play it myself yet - as I still need to assemble my 1x12 cab and need to figure out how to best mount the speaker. It´s not really clear to me how exactly to install the screws and t-nuts which were provided with the unloaded cab (see pictures below). Surprisingly, I also couldn´t find any other info on the exact way and the hardware used for mounting speakers into cabs. In most tutorials this part is simply left out it seems. Only thing I found here on the forum is this thread: http://forum.metroamp.com/viewtopic.php?f=14&t=21595" onclick="window.open(this.href);return false;
But here the full hardware sequence is not mentioned again. I would however much rather use simple cheese-head screws (and nuts!?) - as used on vintage Marshall cabs. If anybody could tell me which screws/hardware exactly to use for mounting a single Celestion Greenback into a cab - I´d be much abliged!
I also installed a Lar-Mar PPIMV - which is the orange knob you can see in the back.
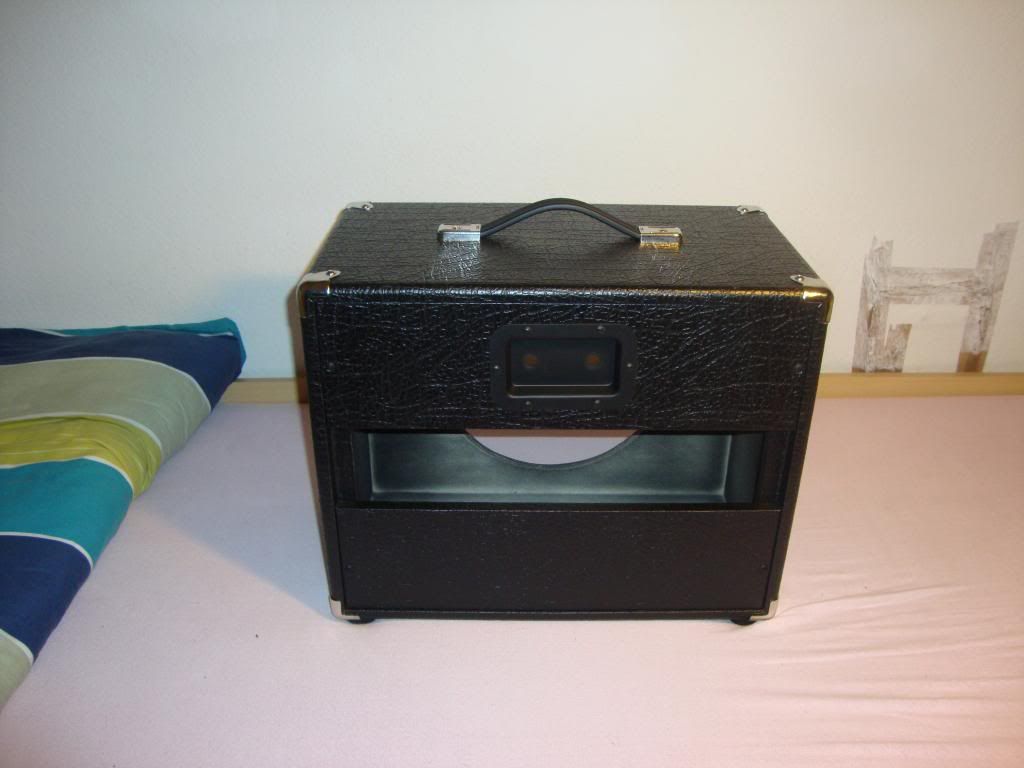
Here are the pics of the finished amp in its head cab:
http://i1279.photobucket.com/albums/y52 ... e12e07.jpg" onclick="window.open(this.href);return false;
http://i1279.photobucket.com/albums/y52 ... c1cc2a.jpg" onclick="window.open(this.href);return false;
http://i1279.photobucket.com/albums/y52 ... b9f643.jpg" onclick="window.open(this.href);return false;
http://i1279.photobucket.com/albums/y52 ... a304b6.jpg" onclick="window.open(this.href);return false;
http://i1279.photobucket.com/albums/y52 ... ea7726.jpg" onclick="window.open(this.href);return false;
http://i1279.photobucket.com/albums/y52 ... 4a7859.jpg" onclick="window.open(this.href);return false;
and here is the unloaded 1x12 cab which needs to be fitted with a single Celestion G12M 25W speaker (only for home use) including the (to me) odd hardware:
http://i1279.photobucket.com/albums/y52 ... 811577.jpg" onclick="window.open(this.href);return false;
http://i1279.photobucket.com/albums/y52 ... 896501.jpg" onclick="window.open(this.href);return false;
http://i1279.photobucket.com/albums/y52 ... c90484.jpg" onclick="window.open(this.href);return false;
http://i1279.photobucket.com/albums/y52 ... 4af11b.jpg" onclick="window.open(this.href);return false;
http://i1279.photobucket.com/albums/y52 ... c1eaf6.jpg" onclick="window.open(this.href);return false;
http://i1279.photobucket.com/albums/y52 ... 3c95e9.jpg" onclick="window.open(this.href);return false;
Cheers - and looking forward to replies
YF
But here the full hardware sequence is not mentioned again. I would however much rather use simple cheese-head screws (and nuts!?) - as used on vintage Marshall cabs. If anybody could tell me which screws/hardware exactly to use for mounting a single Celestion Greenback into a cab - I´d be much abliged!
I also installed a Lar-Mar PPIMV - which is the orange knob you can see in the back.
Here are the pics of the finished amp in its head cab:
http://i1279.photobucket.com/albums/y52 ... e12e07.jpg" onclick="window.open(this.href);return false;
http://i1279.photobucket.com/albums/y52 ... c1cc2a.jpg" onclick="window.open(this.href);return false;
http://i1279.photobucket.com/albums/y52 ... b9f643.jpg" onclick="window.open(this.href);return false;
http://i1279.photobucket.com/albums/y52 ... a304b6.jpg" onclick="window.open(this.href);return false;
http://i1279.photobucket.com/albums/y52 ... ea7726.jpg" onclick="window.open(this.href);return false;
http://i1279.photobucket.com/albums/y52 ... 4a7859.jpg" onclick="window.open(this.href);return false;
and here is the unloaded 1x12 cab which needs to be fitted with a single Celestion G12M 25W speaker (only for home use) including the (to me) odd hardware:
http://i1279.photobucket.com/albums/y52 ... 811577.jpg" onclick="window.open(this.href);return false;
http://i1279.photobucket.com/albums/y52 ... 896501.jpg" onclick="window.open(this.href);return false;
http://i1279.photobucket.com/albums/y52 ... c90484.jpg" onclick="window.open(this.href);return false;
http://i1279.photobucket.com/albums/y52 ... 4af11b.jpg" onclick="window.open(this.href);return false;
http://i1279.photobucket.com/albums/y52 ... c1eaf6.jpg" onclick="window.open(this.href);return false;
http://i1279.photobucket.com/albums/y52 ... 3c95e9.jpg" onclick="window.open(this.href);return false;
Cheers - and looking forward to replies
YF
Last edited by young flower on Fri Oct 18, 2013 5:55 pm, edited 1 time in total.
-
neikeel

- Senior Member
- Posts: 7231
- Joined: Tue Dec 06, 2005 8:31 am
- Location: Suffolk, England
Re: 1969 SB build - the journey begins
Looks good!
For the speaker I suggest you take the baffle out and lay it flat on the bench. Align the speaker over the hole in the baffle and mark the hole centre.
Drill a hole right through the baffle the same diameter as the sleeve on the captive nuts.
Supporting the baffle tap the nuts into the front of the baffle then using a screw with large washer and a spacer (usually a nut larger than the screw size and pull the captive nut spikes right into the wood of the baffle (DON'T use the speaker chassis to do this! The captive nut needs to be pulled home hard before you mount the speaker.
Those screws you show are the wrong ones for a celestion speaker.
Get some cheesehead screws of the correct thread and some serrated lockwashers. These screws can be Poxidrive,Hex or Flat head screw driver type - does not matter.
Important thing is to gently and evenly snug each screw home equally moving around the speaker. The screws should not be tight - just snug.
Play it for a few hours and gently resnug.
That's it. Just makes sure you are careful with the speaker do not overtighten etc or you will distort the chassis and get a scrape or a rub.
Neil
-
young flower
- Senior Member
- Posts: 119
- Joined: Sun Mar 04, 2012 7:38 pm
- Just the numbers in order: 13492
- Location: Austria, Vienna
Re: 1969 SB build - the journey begins
ThanksLooks good!
As I said the hardware (meaning the spiked captive nuts and wrong screws shown in the pictures) was delivered with the unloaded cab and somehow caused me a bit of headache because I couldn´t figure out how these should be fitted.
As you pointed out - these screw heads would only make sense when countersunk from the baffle outside, which didn´t seem the right way to do it to me.
So - you say using these spiked captive nuts is recommended? Is this the way the cheesehead-screws on vintage Marshall cabs could be inserted from the inside of the baffle (screwhead on the inside of the cab)? What exactly does Marshall use here? Somehow I doubt they used these spiked captive nuts back in the day... Unfortunately I couldn´t find ANY pictures of this at all...
Just want the best (hopefully easiest) way to do this.
I know - thanks for reminding me!Just make sure you are careful with the speaker do not overtighten etc or you will distort the chassis and get a scrape or a rub.
Thanks a lot Neil
Cheers K.